2.2” TFT Displey conect to Arduino UNO
Module
- 2.2 Inch TFT SPI LCD Display Module 240*320 ILI9341 with SD Card Slot for Arduino Raspberry Pi 51/AVR/STM32/ARM/PIC
- Aliexpress
- 542JPY /4.97USD
- ILI9341搭載 2.2インチ TFT液晶 [MSP2202]
- SwitchScience
- 1,650JPY
Wiki
How to
Wiring
Pin Connections, but need to change 5v > 3.3v by Voltage Divider or level conversion module

-
Voltage Divider
- ref.Interfacing Arduino with ILI9341 color TFT display
- All Arduino UNO board output pins are 5V, connecting a 5V pin to the ILI9341 TFT display may damage its controller.
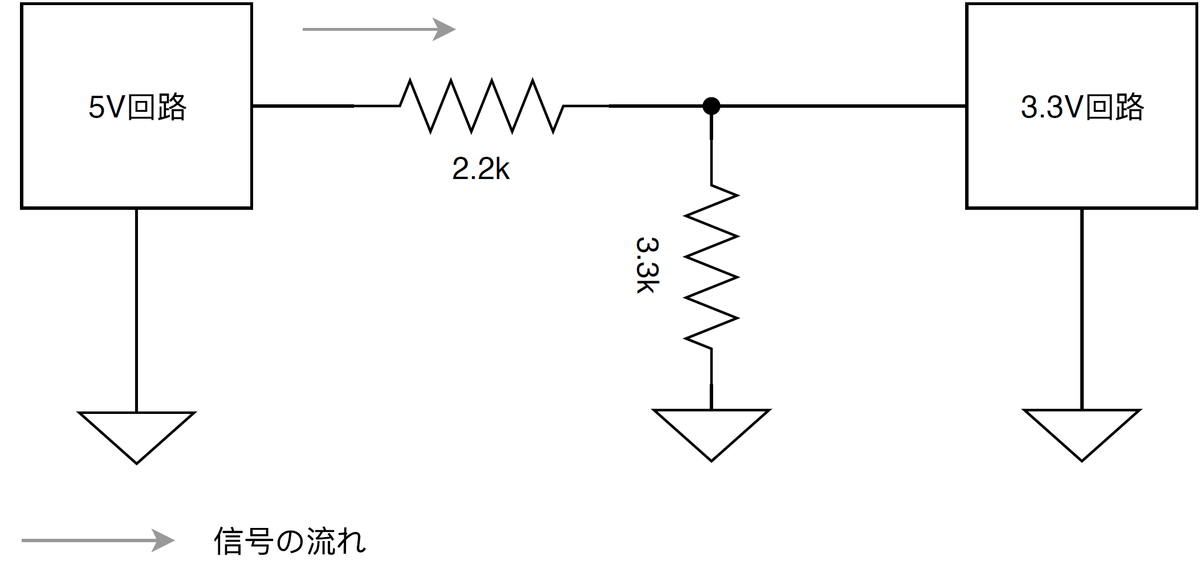
- To connect the Arduino to the display module, use voltage divider for each line which means there are 5 voltage dividers.
- Each voltage divider consists of 2.2k and 3.3k resistors, this drops the 5V into 3V which is sufficient.

-
External Level Conversion Module
Program Download
- 2.2 inch SPI Module Package

Copy these two dependent_libraly (LCDWIKI_GUI,LCDWIKI_SPI) to ArduinoIDE sketchbook location folder

Upload .ino
- Open Simple_test.ino in Arduino IDE
- Upload to Arduino UNO


Do I need Vcc 3.3v from Arduino?
- Solder J1
- ref.Run Arduino Demo in spi model

- After shorting, the runtime module VCC The pin must be connected to a 5V power supply (not connected to 3.3V).

- ref.Run Arduino Demo in spi model
| Vcc from Arduino UNO | J1 | LDO Voltage Regulator | TFT works |
|---|---|---|---|
| 3.3v | short | Vin=Vout=3.3v | O |
| 5v | short | Vin=Vout=5v | X |
| 3.3v | off | Vin=3.3v, Vout=3.3v | O |
| 5v | off | Vin=5v, Vout=3.3v | O |
- ref. sch
- ref. Regulator XC6206
About Voltage Divider #1

-
SPI using 10MHz clock, signal will change from Square to triangle.

-
Add 20-30pF Capacitor


About Voltage Divider #2
Make 5Vから3.3Vに変換する
5Vを3.3Vにするには、電圧を2/3にする必要があります。
これは、同じ抵抗が3つあれば実現できます。
同じ抵抗を以下のように接続して3.3Vに分圧します。
(A)(B)どちらの方法でも問題ありません。

 3.3Vを作成するには、5Vの電圧を1:2に分圧するため、抵抗値も1:2にします。
そのため、同じ抵抗が3つなくても、抵抗値が1:2になる抵抗が2本あればよいです。
電流を考える場合は、抵抗値を考慮する必要がありますが、Raspberry Piや、Arduinoのモジュール接続は、電流が制限されている場合がほとんどです。
心配な場合は、1kΩ以上の抵抗で接続すればよいでしょう。