I2C Bridge and Node with Arduino sketch
- class page Networking and Communications
-
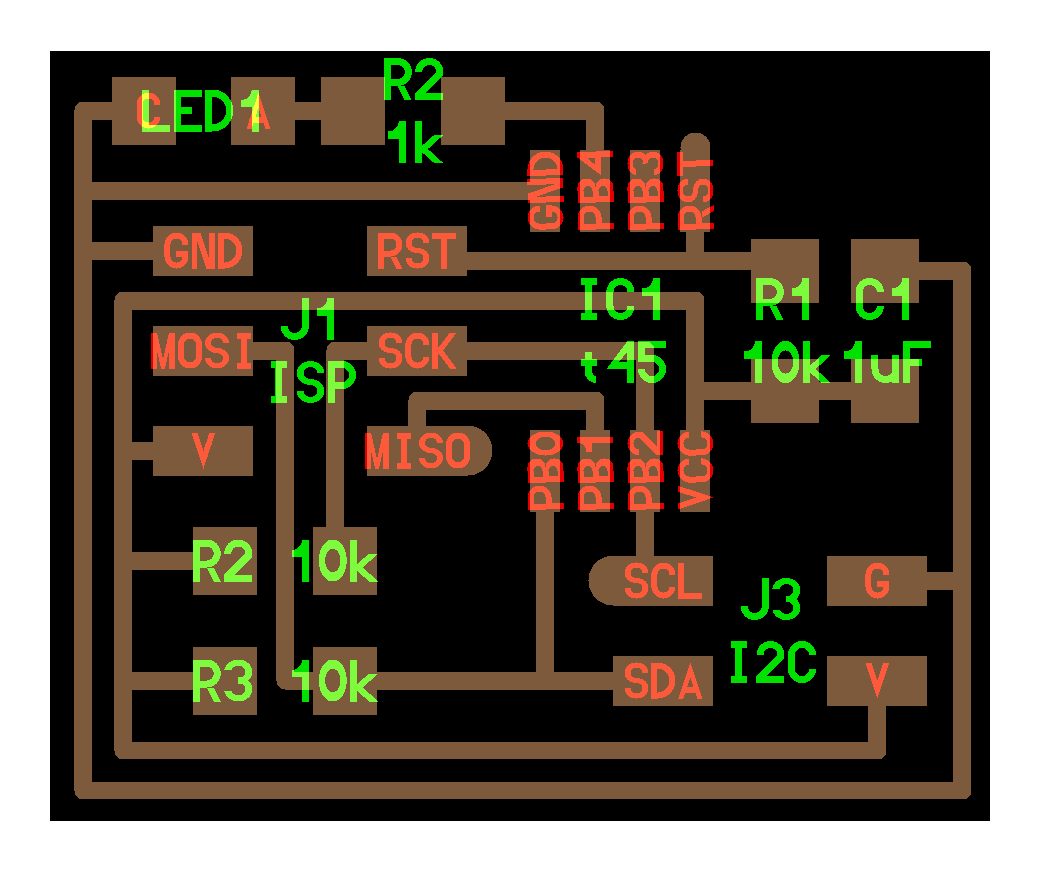
hello.I2C.45.bridge board

-
hello.I2C.45.node board
Install ATTinyCore
ref.Arduino IDE に ATtiny45/85/2313 他の開発環境を組み込む
Arduino IDE > preference > board manager URL > http://drazzy.com/package_drazzy.com_index.json
 Tool > Board > Board Maganer > Serch: attiny > Select:ATTInyCore by Spence Konde > Install
 Tool > Board:> ATtiny Universal > ATiny24/44/84

Note
ATTinyCore can use
TEST 1: SoftwareSerialExample
Arduino > File > Sketch Example > ATTiny25/45/85 Sketch Example > SoftwareSerial > SoftwareSerialExample This sketch can be used in Arduino Uno and Attiny45 I2C Bridge board.
#include <SoftwareSerial.h>

SoftwareSerial mySerial(3, 4); // RX, TX

void setup()
{
  // Open serial communications and wait for port to open:
  Serial.begin(57600);
  while (!Serial) {
    ; // wait for serial port to connect. Needed for Leonardo only
  }


  Serial.println("Goodnight moon!");

  // set the data rate for the SoftwareSerial port
  mySerial.begin(4800);
  mySerial.println("Hello, world?");
}

void loop() // run over and over
{
  if (mySerial.available())
    Serial.write(mySerial.read());
  if (Serial.available())
    mySerial.write(Serial.read());
}
TEST 2: Simplify SoftwareSerial for ATtiny45
#include <SoftwareSerial.h>

SoftwareSerial mySerial(3, 4); // RX, TX

void setup() {
  mySerial.begin(4800);
  mySerial.println("SoftwareSerial_Hello");
}

void loop() {
  if(mySerial.available()){
    mySerial.write(mySerial.read());  // 1 -> 1
//    mySerial.println(mySerial.read());  // 1 -> 49 //文字列の最後に改行コードであるCR(\r)とLF(\n)を付与して送信

    char c = mySerial.read();
//    mySerial.write(c);  // 1 -> 1
//    mySerial.println(c);  // 1 -> 1
//    mySerial.print(c);   // 1 -> 1
  }
}


TEST 3: I2C Master
For Arduino Uno
ATtiny45 has 4kB(4096B) Flash. This sketch is 4516B(110%).
ATtiny85 has 8kB Flash. It can be used.
#include <Wire.h>

#include <SoftwareSerial.h>
SoftwareSerial mySerial(3, 4); // RX, TX

void setup() {

while (!Serial) {
    ; // wait for serial port to connect. Needed for native USB port only
  }
  mySerial.begin(4800);
  mySerial.println("SoftwareSerial_Hello");

  Wire.begin();        // join i2c bus (address optional for master)

}

void loop() {
  Wire.requestFrom(8, 6);    // request 6 bytes from slave device #8

  //while (Wire.available()) { // slave may send less than requested
    char c = Wire.read(); // receive a byte as character
    mySerial.print(c);         // print the character
  //}

  delay(500);
}
I2C Slave
#include <Wire.h>

void setup() {
  Wire.begin(8);                // join i2c bus with address #8
  Wire.onRequest(requestEvent); // register event

   pinMode(PB4, OUTPUT);
}

void loop() {
  delay(100);
}

// function that executes whenever data is requested by master
// this function is registered as an event, see setup()
void requestEvent() {
  digitalWrite(PB4, HIGH);
  delay(8000);
  Wire.write("hello "); // respond with message of 6 bytes
  // as expected by master
  digitalWrite(PB4, LOW);
  delay(8000);
}
Burn fuses from Terminal without makefile
ref.AVR Fuse Calculator
ref.fuse bits - FabISP
CKDIV8 programmed(0)
$ avrdude -p t45 -P usb -c atmelice_isp -U lfuse:w:0x62:m
CKDIV8 unprogrammed(1) -> don’t divide
$ avrdude -p t45 -P usb -c atmelice_isp -U lfuse:w:0xE2:m