9. Embedded programming
Class site
Class video
Fab-20190313B_Review07: computer-controlled machining
Fab-20190313D_Lesson08: embedded programming
video
Assignment
individual assignment:
read a microcontroller data sheet
program your board to do something,
with as many different programming languages
and programming environments as possiblegroup assignment:
compare the performance and development workflows
for other architectures
Learning outcomes
- Identify relevant information in a microcontroller data sheet.
- Implement programming protocols
Have you?
- Documented what you learned from reading a microcontroller datasheet.
- What questions do you have? What would you like to learn more about?
- Programmed your board
- Described the programming process/es you used
- Included your code
Tutorial
9.1. What is Make and Makefiles
9.2. Timing an AVR microcontroller
9.3. ATtiny44 fuses
9.4. ATtiny Using C
9.5. ATtiny Using Arduino
For Japanese
data sheetを読む
week 7 Electronics designの書込みの手順
- (1) c-codeとmakefileをダウンロード: hello.ftdi.44.echo.interrupt.c hello.ftdi.44.echo.interrupt.c.make
- (2) 手順:http://academy.cba.mit.edu/classes/embedded_programming/hello.ftdi.44.program.png
- (3)
$ make -f hello.ftdi.44.echo.c.make - (4)
$ sudo make -f hello.ftdi.44.echo.c.make program-usbtiny-fuses - (5)
$ sudo make -f hello.ftdi.44.echo.c.make program-usbtiny - (6) term.pyをダウンロード: Embedded Programming > 検索
- (7)
$ python term.py /dev/ttyUSB 115200
Makefileの構造
ターゲット名:依存ファイル名
[TAB]コマンド行
作りたいもの:材料
[TAB]作り方
手順
- (1)でダウンロードしたもの
- (1-1) hello.ftdi.44.echo.interrupt.c: Attiny に書くC言語プログラム
- (1-2) hello.ftdi.44.echo.interrupt.c.make: Makefile(makeコマンドで実行する時の、コンパイルされるソースコードの依存関係や、コンパイルに必要なコマンドなどの情報が書かれている)
- (3) $ make -f hello.ftdi.44.echo.c.make の意味
- make: makeコマンド
- -f file: hello.ftdi.44.echo.c.makeをMakefileとして使用
- 実行で作られたもの
- hello.ftdi.44.echo.c.hex : C言語で書かれたコードをAVRで書き込む為に変換したもの
- hello.ftdi.44.echo.c.out : size?
- (4) $ sudo make -f hello.ftdi.44.echo.c.make program-usbtiny-fuses の意味
- Makefileに書かれている program-usbtiny-fusesを実行して、fuseをAttinyに書き込む
- program-usbtiny-fuses: $(PROJECT).hex avrdude -p t44 -P usb -c usbtiny -U lfuse:w:0x5E:m
- コマンド行
- avrdude -p t44 -P usb -c usbtiny -U lfuse:w:0x5E:m
- avrdude: AVR Downloader/UploaDEr
- -p t44 : AVR device
- -P usb : connection port
- -c usbtiny : programmer type
- -U lfuse:w:0x5E:m : memtype:r|w|v:
[:format] - lfuse : 書き込むメモリの場所を指定 Fuse Low Byte (FLB)
- w : 指定されたファイルを読み、その内容を指定されたメモリに書き込む
- 0x5E : 書き込むもの 5E(16進数) = 0101 1110(2進数)
- m : イミディエート(即値)モード
- avrdude -p t44 -P usb -c usbtiny -U lfuse:w:0x5E:m
- コマンド行
- Attiny44にはFuse Extended Byte, Fuse High Byte, Fuse Low Byteがある > datasheet 19.2
- 1 Byte = 8 bit
- 0000 0000 ~ 1111 1111(2進数 0b)
- 00〜FF(16進数 0x)
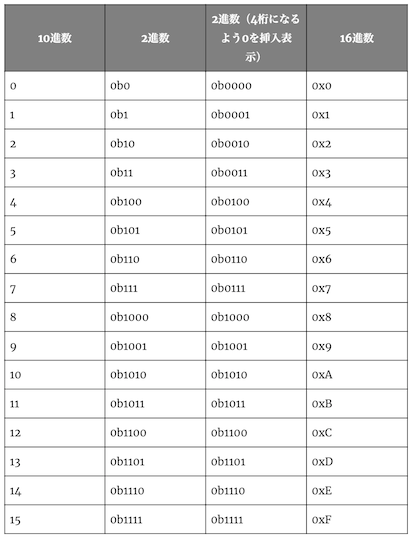
- 1 Byte = 8 bit
-
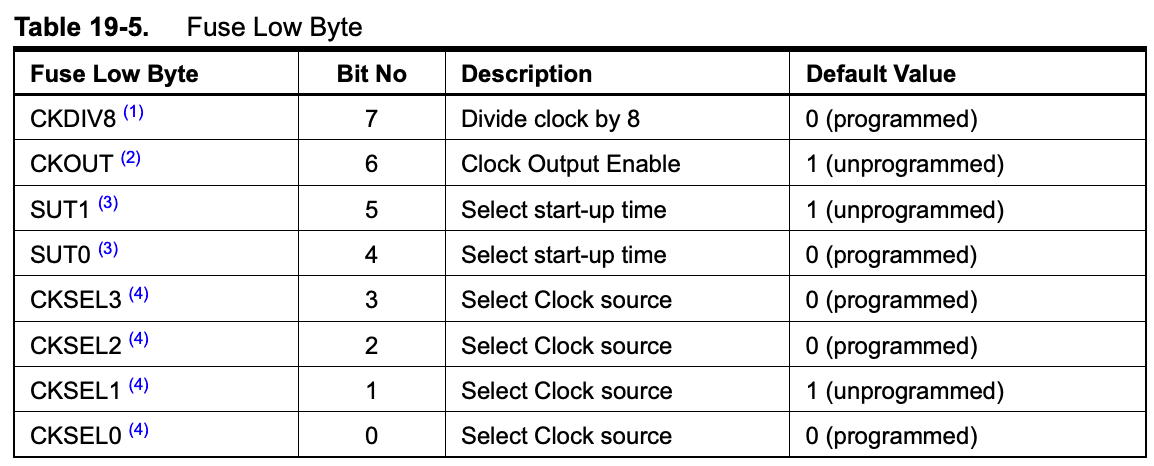
Fuse Low Byte: datesheet Table 19-5
- 0110 0010 : Default Value (Table 19-5)
- 0101 1110 <- lfuse: 0x5E <- (5)
- Bit[7]: CKDIV8 Divide Clock by 8
- CKDIV8 0
- Bit[6]: CKOUT Clock Output Enable
- CKOUT 1
- Bit[5:4]: SUT[1:0] Start-Up Time
- SUT[1:0] 10 > 01
- Bit[3:1]: CKSEL[3:1] ClocK SourcE
- CKSEL[3:1] 001 > 111
- Frequency Range (MHz) 8.0- (Table 6-9)
- CKSEL[3:1] 001 > 111
- Bit[0]: CKSEL[0]
- CKSEL[0] 0
- CKSEL[0] 0 & SUIT[1:0] 01 > Additional Delay from Reset: 14CK + 64 ms (Table 6-10)
- Bit[7]: CKDIV8 Divide Clock by 8
- Fuse calculator
-
(5) sudo make -f hello.ftdi.44.echo.c.make program-usbtiny の意味
- program-usbtiny: $(PROJECT).hex avrdude -p t44 -P usb -c usbtiny -U flash:w:$(PROJECT).c.hex
- コマンド行
- avrdude -p t44 -P usb -c usbtiny -U flash:w:$(PROJECT).c.hex
- -U flash : フラッシュメモリ(プログラムを書き込むメモリ)へ
- w : 指定されたファイルを読み、その内容を指定されたメモリに書き込む
- $(PROJECT).c.hex : 書き込もの
- avrdude -p t44 -P usb -c usbtiny -U flash:w:$(PROJECT).c.hex
- コマンド行
- program-usbtiny: $(PROJECT).hex avrdude -p t44 -P usb -c usbtiny -U flash:w:$(PROJECT).c.hex
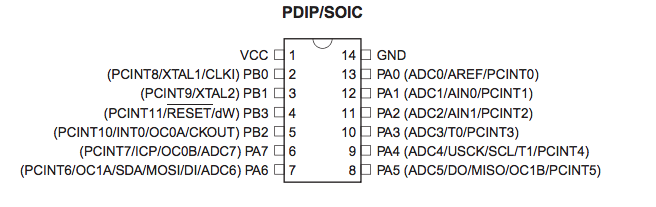
Attiny44 のピン
-
Figure 1-1. Pinout of ATtiny44
-
echo hello-world board

-
空いていたピン
- 左
- PB2
- PA7
- 右
- PA2
- PA3
- 左
-
- Memories(AVR内で情報を記録する場所)
- 5.1 In-System Re-programmable Flash Program Memory
- プログラムを書き込むフラッシュメモリ
- Attiny44: 4KB
- 5.2 SRAM Data Memory
- Register File: 32バイト、数は少ないが読み書きが高速でいろんな計算動作ができる
- I/O Register: 64バイト
- Internal data SRAM: 258 x8 バイト、読み書きは遅く演算対象にはできないが、数が多い
- 5.3 EEPROM Data Memory
- AVRコンピュータの外にある記憶装置を1つのパッケージに収めたもの
-
I/O Register
- 入出力ポート
- 出力ポート: データを書き込むと書き込んだデータのビットに対応したピンの電圧が変化するもの
- 入力ポート: 外部から与えられた電圧に応じてレジスタのビット値が変化し、読み取ることができるもの
- 入出力ポートに関係するレジスタ
- 入出力ポートに関係するレジスタはポート毎に3つ(ATTiny44にはポートA,Bがある)
- DDRA – Port A Data Direction Register、方向設定レジスタ
- datasheet 10.3.3
- DDRレジスタとはマイコンのピンを出力か入力か設定するレジスタ
- Bit[x]に(0)が書き込まれるとピンは入力ポートになる
- Bit[x]に(1)が書き込まれるとピンは出力ポートになる
DDRA = 0b11110000; //2進法での書き方
DDRA = 0xF0; //16進数での書き方 - ポートAのpin7,6,5,4が出力に、pin3,2,1,0を入力になる
- PORTA – Port B Data Register、データレジスタ
- datasheet 10.3.2
- DDRレジスタで設定したのが入力(0)か出力(1)かで異なる
- 入力設定時:内部プルアップを有効にするか無効にするかを設定
- 出力設定時:ピンの電圧をHighにするかLowにするか設定
- DDRA 入力(0): 内部プルアップを無効(0)
- DDRA 入力(0): 内部プルアップを有効(1) > 入力はVccに20~100kΩでプルアップ
- DDRA 出力(1): ピンの電圧をLow(0)
- DDRA 出力(1): ピンの電圧をHigh(1)
DDRA = 0b11110000;
PORTA = 0b11001100; - PA7,6: ピンの電圧をHigh
- PA5,4: ピンの電圧をLow
- PA3,2:内部プルアップを有効
- PA1,0:内部プルアップを無効
- PINA – Port A Input Pins、入力用レジスタ
- datasheet 10.3.4
- DDRレジスタで入力(0)に設定したピンの電圧がHigh(1)かLow(0)かを格納する
DDRA = 0b11110000;
if (PINA = 0b0000001;) //PA0の電圧がHighなら
{ PORTA 0b10000000;} // PA7の出力をHighにする
- ref.CRSマイコン講座 @ ウィキ
- DDRA – Port A Data Direction Register、方向設定レジスタ
- ポートA: PA0:7
- datasheet 10.3.2
- ポートB: PB0:3
- datasheet 10.3.5
- 入出力ポートに関係するレジスタはポート毎に3つ(ATTiny44にはポートA,Bがある)
- 入出力ポート
書き込んだプログラム
- hello.ftdi.44.echo.interrupt.c
- ヘッダファイル
<avr/io.h>インクルード#include <avr/io.h>- avrのIOポートをC言語のマクロで定義
#define serial_pin_in (1 << PA0)- ビット操作のマクロ
PORTB = (1 << PINB5)// PB5ピンだけをHighにし、残りをLowにするPORTB = 0xFF; //1111 1111PORTB = (1 << PINB5); //0010 0000
- ビット操作のマクロ
- 変換ツール
- fuse bits - FabISP
Group Assignment
- avr以外のものを使ってみる(プログラムしてみる)
- Raspberry Pi
- micro:bit
- AVR + ArduinoIDE
Individual Assignment
- datasheetを読む
- LEDとボタンを使ったプログラムを書く
- C
- Arduino
- mods?
- …
- 動かなかったら
- オシロスコープでタイミングを見る
- delayの値より実際が長かったら
- fuse CKDIV8 Divide Clock by 8を確認
- Atmel Studioでデバッグを試みる
- 動かなかったら
- 出来るだけ違う環境を試す
- bootloader
- Arduino
- bootloader
For Next Week
- Monday 9:00 DST, 22:00 JST
- Recitaion: none
- Tuesday Time:
- Asia Regional Review: 13:00-14:00 JST and 22:00-23:00 JST
- 可能な限り参加してください
- videoconference
- conference for meetings: https://bluejeans.com/fabevent/1248
- Wednesday 9:00 DST, 22:00JST
- videoconference
- Zoom meeting ID: 198 434 642, password: 1234 ~500 ports
- 多分使用しないhttps://bluejeans.com/academany/2486 ~200 ports
- Molding and Casting
- videoconference
assignment
group assignment:
review the safety data sheets for each of your molding and casting materials,
then make and compare test casts with each of themindividual assignment:
design a 3D mold around the stock and tooling that you’ll be using,
mill it, and use it to cast parts
- material: モデリングワックス:92x152x39mm 各1個 >再利用する >MDX-15掃除> 削りかすを回収 >使い終わったブロックを再び長方形に
- mold: MOLD STAR 16 FAST 0.9kgx2 for 3
- cast: SMOOTH-CAST 300 0.9kgx2 for 3
- collor: SO-STRONG 9-パック カラーサンプラ―